

CyberSnap Integration with vSphere vCenter and NetApp
1. Overview
This document outlines the integration of CyberSnap with VMware vSphere vCenter and NetApp storage to deliver automated virtual machine (VM) integrity testing and cyber threat scanning using immutable NetApp snapshots. This integration enhances cyber resilience by enabling isolated, non-disruptive security testing of backup data.
2. Architecture
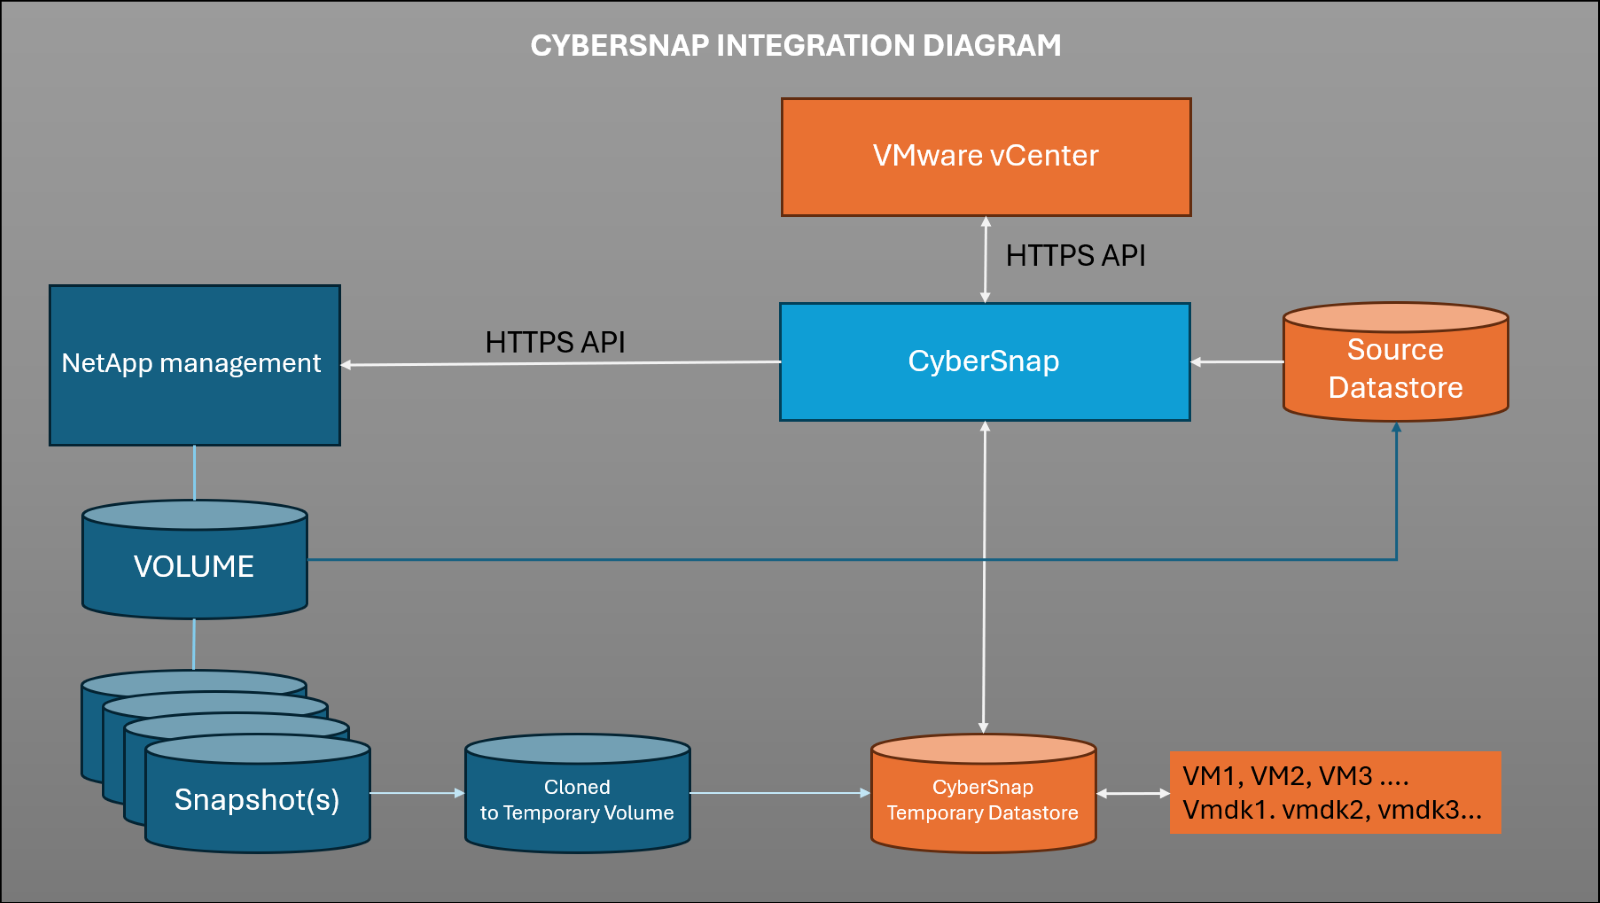
CyberSnap interacts with the following components:
- vSphere vCenter: For VM inventory, snapshot metadata, and orchestration of VM clones.
CyberSnap connects to VMware vCenter via API to collect virtual machines from the selected Source Datastore and identify the corresponding NetApp volume associated with that datastore.
- NetApp ONTAP: For accessing immutable snapshots of datastores and enabling instant clone/mount operations.
During the scanning process, CyberSnap communicates with NetApp via API to retrieve all available snapshots for the selected volume. Each snapshot is cloned to a temporary volume, which is then attached to VMware vCenter for scanning purposes.
- CyberSnap Server: The orchestrator that performs automated integrity testing and security scans within an isolated environment.
Because scanning is performed on cloned data, the original source data and all snapshots remain intact. Findings from the scan are marked in the CyberSnap console, and using the SnapMap, you can easily identify if any issues are associated with specific snapshots.
3. Prerequisites
VMware vSphere
- vCenter 7.0 and above
- VMware Tools installed in guest VMs
NetApp
- ONTAP 9.x or later
- NFS or iSCSI/FC (VMFS) datastores used for VM storage
- Snapshot policy configured on NetApp volumes
- FlexClone license enabled
CyberSnap
- Deployed as a virtual appliance consisting of two servers: management and proxy.
- Network access to vCenter and NetApp storage is over port 443
- Outbound internet access (for threat intelligence and Ai Forensic Analysis updates via the CyberSnap Proxy server)
4. Integration Workflow
Step 1: Snapshot Discovery
- CyberSnap queries vCenter for the VM inventory and NetApp ONTAP for available snapshots.
- Metadata is correlated to match snapshots with associated VMs and datastores.
Step 2: Snapshot Mounting (via FlexClone)
- CyberSnap uses ONTAP APIs to create a temporary FlexClone volume from a NetApp snapshot.
- The cloned volume is presented to a secure CyberSnap analysis host via NFS or iSCSI/FC.
Step 3: VM Reconstruction
- VMs are re-registered.
- Memory is not restored, preserving snapshot state for disk analysis only.
- Network isolation ensures no risk of infection propagation.
Step 4: VM Integrity Testing
- Boot testing: CyberSnap powers on the VM to check for vSphere-reported power-on errors.
- Log file and filesystem checks: Looks for ransomware. Malware and behavioral cyber-attack indicators or file corruption.
Step 5: CyberScan of VMs
CyberSnap performs an in-depth security scan of the restored VMs, including:
- Malware and ransomware detection
- Persistence and backdoor checks
- YARA rule execution
- Suspicious binary identification
- NLP based threat actor mal language detection
- Advanced Persistance Threat (APT)
- Cyber Crime Tools detection
Step 6: Reporting & Response
- Results are compiled in CyberSnap’s SnapMap dashboard.
- Alerts can be sent via SMTP.
- AI remediation actions recommendations are available.
5. Security Considerations
- All testing is performed in a sandboxed “clean room“ environment, ensuring production remains untouched.
- Snapshots are accessed in read-only mode; original data is never altered.
- Audit logs are generated for every operation for compliance purposes.
6. Integration Benefits
| Feature | Benefit |
| Immutable snapshot scanning | Ensure threat detection without affecting production |
| vCenter + NetApp orchestration | Seamless and automated VM analysis pipeline |
| Isolated recovery environment | Prevents re-infection or lateral threat movement |
| Fast RPO validation | Snapshot health and cyber hygiene verification |
7. Troubleshooting Tips
- Snapshot not found: Ensure NetApp snapshots are configured and that retention policies are not deleting required data.
- Clone failure: Verify that the FlexClone license is enabled and that sufficient space is available on the aggregate.
- VM boot fails:
- Ensure the VM configuration file (.vmx) is intact and not corrupted.
- Confirm that the virtual hardware version is compatible with the ESXi host version.
- Make sure there are no device conflicts or missing devices in the VM settings.
- Inspect VM logs for guest OS-level errors or filesystem corruption.
- Check whether the snapshot was taken during a consistent state or a crash-consistent state.